


Водосберегающая и эффективная Встроенная капельная ирригационная лента система капельного орошения
- Категория: Garden Supplies >>>
- Поставщик: Juancheng,County,Yibiyuan,Water-Saving,Equipment,Technology,Co.,Ltd.
Поделиться:
Описание и отзывы
Трекер стоимости
| Месяц | Минимальная цена | Макс. стоимость |
|---|---|---|
| Sep-17-2025 | 0.0 $* | 0.21 $* |
| Aug-17-2025 | 0.23 $* | 0.95 $* |
| Jul-17-2025 | 0.37 $* | 0.36 $* |
| Jun-17-2025 | 0.41 $* | 0.63 $* |
| May-17-2025 | 0.50 $* | 0.70 $* |
| Apr-17-2025 | 0.25 $* | 0.90 $* |
| Mar-17-2025 | 0.63 $* | 0.54 $* |
| Feb-17-2025 | 0.26 $* | 0.53 $* |
| Jan-17-2025 | 0.35 $* | 0.56 $* |
Характеристики
Products Description
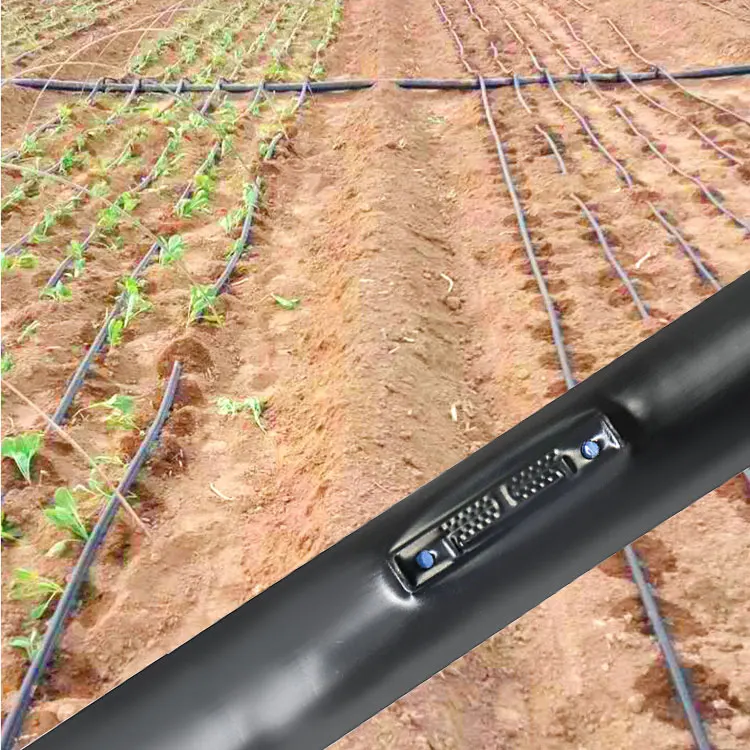
Irrigation Drip Tape
Other Watering & Irrigation Kit Plant Watering System Agricultural Drip Irrigation Pipes Manufacturing


Precision Irrigation Drip Tape
100% PE raw material , anti-UV, anti-corrosion, and durability.
Extruded with dripper inside, light weight and packed by roll, good for ransportation.
Suitable for large farm application.
Precision performance Cv ≤ 5%.
The irrigation drip tape features built-in precision drippers that are evenly arranged to ensure uniformly dripping.Extruded with dripper inside, light weight and packed by roll, good for ransportation.
Suitable for large farm application.
Precision performance Cv ≤ 5%.
According to the tests conducted by the Irrigation and Drainage Equipment Inspection Center of the China Ministry of Water Resources, the dripping uniformity reaches 98.56%.
Diameter (mm) | Wall Thickness (mm) | Spacing (mm) | Roll Weight (kg) | Roll Length (m) |
16 | 0.18 | 300 | 19.0 | 2000 |
16 | 0.18 | 200 | 19.6 | 2000 |
16 | 0.18 | 150 | 15 | 1500 |
16 | 0.18 | 100 | 16.2 | 1500 |
16 | 0.30 | 300 | 22.2 | 1500 |
16 | 0.30 | 200 | 23.0 | 1500 |
16 | 0.30 | 150 | 15.5 | 1000 |
16 | 0.30 | 100 | 16.5 | 1000 |
16 | 0.40 | 300 | 15.3 | 800 |
16 | 0.40 | 200 | 15.7 | 800 |
16 | 0.40 | 150 | 16.0 | 800 |
16 | 0.40 | 100 | 16.7 | 800 |
Drip tape can be installed easily either above or below ground. It is designed for use in vegetable gardens, narrow rows of vegetation, and for row crops. Most often, a vegetable garden or vegetable crops are planted in parallel rows. This makes the layout of a drip tape very easy.
To successfully use drip tape for seed germination, the soil type, the drip tape outlet spacing, and the depth and spacing between the drip tape laterals should be determined first. The drip tape must be close enough to the surface and the drip outlets must be in close enough spacing to germinate the seeds. For example, drip tape 4 to 5 inches deep was successfully used to germinate onion seeds in silt loam soil, while drip tape with 12 inch spacing failed to uniformly germinate the same crop.
When using a drip tape system, the right amount of water must be applied. If more water is applied than the plants need, most of the benefits that the drip tape system provides will be negated. The soil will be excessively wet, promoting disease, weed growth, and nitrate leaching.
Option one for large coils: Mount the drip tape spool on a stand at the end of the row, tie the stand to the ground and pull the drip tape close to the ground.
Step 1: Install a drip zone or control valve that includes remote control valve or battery operated controller, filter, pressure regulator, and pipe adapter to PVC or poly tubing. We highly recommend using a 10 to 15 PSI pressure regulator.
Step 2: Lay out the main lateral or supply line, PVC pipe, or poly tubing perpendicular to the rows.
Step 3: Place the drip tape at the layout or spacing selected (see the two options suggested above).
Spacing suggestions: Lay out the drip tape at the center of the vegetable row with one line per row, or one line between every two rows if the bed is less than 2' wide.
Recommend Products

Company Profile


Product packaging

FAQ

Q1: How to buy the product?
A: Contact with us by email or by Trade Manager, and inform us all information which you want, or tell us which kind of products you want? will contact you immediately, or we could recommend style to you.
Q2: Whether my own customized products can be made?
A: Sure, we are glad to receive your customized order. Such as print your logo on the products or package will be well accepted.we have our own design team
Q3: Can i get samples before order?
A: Yes, we could offer the sample for free charge, you need bear the freight cost. Within 3 days will be sent out.
Q4: How to solve the quality problem after received the goods.
A: Send the product photos/video to us by email, or send a sample of it to us by express.
Once the problem has been confirmed, we will give you a satisfied solution
A: Send the product photos/video to us by email, or send a sample of it to us by express.
Once the problem has been confirmed, we will give you a satisfied solution


